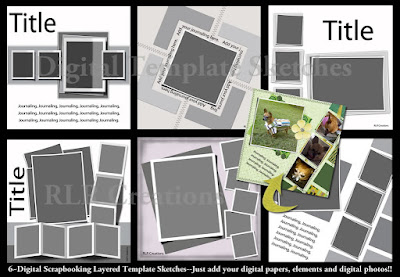
To ensure you get the best results from the pre-made Digital Scrapbooking layout, RLR Creations has written a tutorial, "How To Use PSD Template," for your benefit! You can review the tutorial below:
How to use a Pre-Made PSD Digital Scrapbooking Template:
Pre-Made templates are layered PSD files that you can use in Photoshop, Photoshop Elements or many other software programs in which you can work with layers.
Each pre-made PSD template contains the framework to create a finished digital scrapbooking page where you add your own paper, elements, text, and photos. Each layer in the templates I create is a placeholder for an element in the layout.
These templates are perfect for quick well-designed pages for your digital scrapbooking pages, they can be used over and over and allow you to create a variety of pages, simply by changing the papers and elements you chose, you can create a variety of themes from one pre-made PSD template.
So how do you use these quick pre-designed pages?
Note: This step by step walk through will be written based on Photoshop Elements 7; however the steps can easily be adapted for Photoshop, as well as, other Digital Scrapbooking Programs that allow you to work in layers with PSD files.
Step 1. Open the template in Photoshop Elements then duplicate the template and work with the copy to preserve the original file for later use. Note that the template consists of layers of grayscale shapes; these will be the elements that you will decorate.
1. Open the papers that you want to use for your design.
Step 2: Adding the background paper: Select the background layer, and then copy the paper you want as the background to the template.
1. Make sure that you can see both the paper and the template in the workspace; Window>Menu >Images>Cascade...to display both files.
2. Select the Move tool, then drag and drop the background paper to the template. The paper will be displayed on a new layer above the background layer.
3. With the paper layer selected, press CTRL + G to create a clipping group with the background layer below. Your paper will now be displayed as the background of your template.
Step 3: To fill shape layers with paper on the template: Select a grayscale shape layer, then copy your choice of paper to the template, in the same manner as you did for creating the background lay
1. Select the layer that contains the shape you wish to fill.
2. Make sure that you can see both the paper and the template in the workspace; Window>Menu >Images >Cascade...to display both files.
3. Select the Move tool, then drag and drop the background paper to the template. The paper will be displayed on a new layer above the background layer.
4. With the paper layer selected, press CTRL + G to create a clipping group with the background layer below. Your paper will now be displayed as the background of your template.
Step 4: REPEAT this process with all of the shape layers you wish to fill with digital papers.
Step 5: Adding photos to the template. Select a photo layer and then copy your photo to the template.
1. Open the photos that you want to use for your design.
2. On the template, select the photo layer you want to clip your photo to.
3. Follow steps 2-4 above to display the photo within the photo shape placeholder.
Step 6: Edit the text in the text layers. To Edit Text
1. In the Layers palette, select a text layer. Note: If the font used in the template is not present on your computer, a yellow warning triangle will be displayed in the text layer, and you will be prompted to select another font.
2. Select the Horizontal Type tool and then select the text. Once selected simply replace the existing text with your own text.
3. You can change the font, color, and size of the text on the options bar.
Step 7: Adding Depth to your layout with Drop Shadows.
1. In the Layers palette, select a layer to which you want to add a drop shadow. In this example, drop shadows were added to the title and vertical text, and to the paper shapes.
2. In the Effects palette, click the Layer Styles button, and then select Drop Shadows. Select a drop shadow and click Apply.
Note: After you have applied a style, you can copy the style and paste it into other layers.
3. Right click and choose Copy>Layer Style, from the pop-up menu.
4. To paste the layer style, select the layer to which you want to paste the style. Right-click and choose Paste Layer Style from the pop-up menu.
5. Simply, Copy and Paste the drop shadow as desired on the various elements on your page.
Step 8: Saving your file. After your have completed your page, merge the layers in order to reduce the file size
Note: Once you merge the layers, you can no longer edit text or layers, so be sure that your digital page is finished before completing the following step.
1. From the layer menu, select Merge>Visible.
2. Save your new creation for printing or uploading. File>Save .
Have you found that you only have personal photos to add to this free template and you need the additional elements? Check out RLR Creations creative digital designs. There are Digital Scrapbooking kits for every occassion! You can find them here:

If you enjoy using this free pre-made Digital Scrapbooking template and would like to try others, RLR Creations has more available for purchase here:
LIFTED LAYERS DIGITAL SCRAPBOOKING PSD TEMPLATE SET #1

LIFTED LAYERS DIGITAL SCRAPBOOKING PSD TEMPLATE SET #2
 6 Different PSD Templates~All for $5.00
Be sure to check back in tomorrow for more information on creative scrapbooking activities.


